For collaboration tools, please create a Microsoft Team. O365 Groups are used at PATH to manage distribution lists, shared email inboxes, and shared group calendars.
On this page:
| Table of Contents | ||
|---|---|---|
|
| Insert excerpt | ||||||
|---|---|---|---|---|---|---|
|
Step-by-step guide
For more information on O365 groups, see our how-to guides on groups in OWA
- How to Manage and O365 Group in Outlook Web App
- How Do I Create an O365 Group in Outlook Web App?
- How Do I Schedule a Meeting in an O365 Group Calendar
| Info | ||
|---|---|---|
| ||
To create and manage O365 groups in Outlook, you must be using Outlook 2016. If you're using an older version of Outlook, you must use Outlook Web App to manage them. |
Find the groups you belong to
In Outlook 2016 you can see all the O365 groups you belong to by expanding the Groups section below your mailbox, as shown below.

Creating new groups
You can create and browse existing groups using the buttons shown below.

- Click New Group and then give the group a name.
- Select the privacy option for the group.
- Determine whether members will receive messages sent to the group in their inboxes or just the group's inbox.

| Info | ||
|---|---|---|
| ||
|
Managing your group
If you are a group owner, you can manage your groups from within Outlook.
- To manage membership, navigate to the group and select one of the membership options.
- Click Calendar to view the groups shared calendar.

See the Members of a Group
You can see the members of a group through Outlook (even if you are not the owner of the group).
- In Outlook, go to the Group you wish to see.
- Choose Group Settings for from the ribbon menu.
- Choose Add Members. If you are not the group's owner, you will still be able to see the list of members, but you will not be able to make changes.

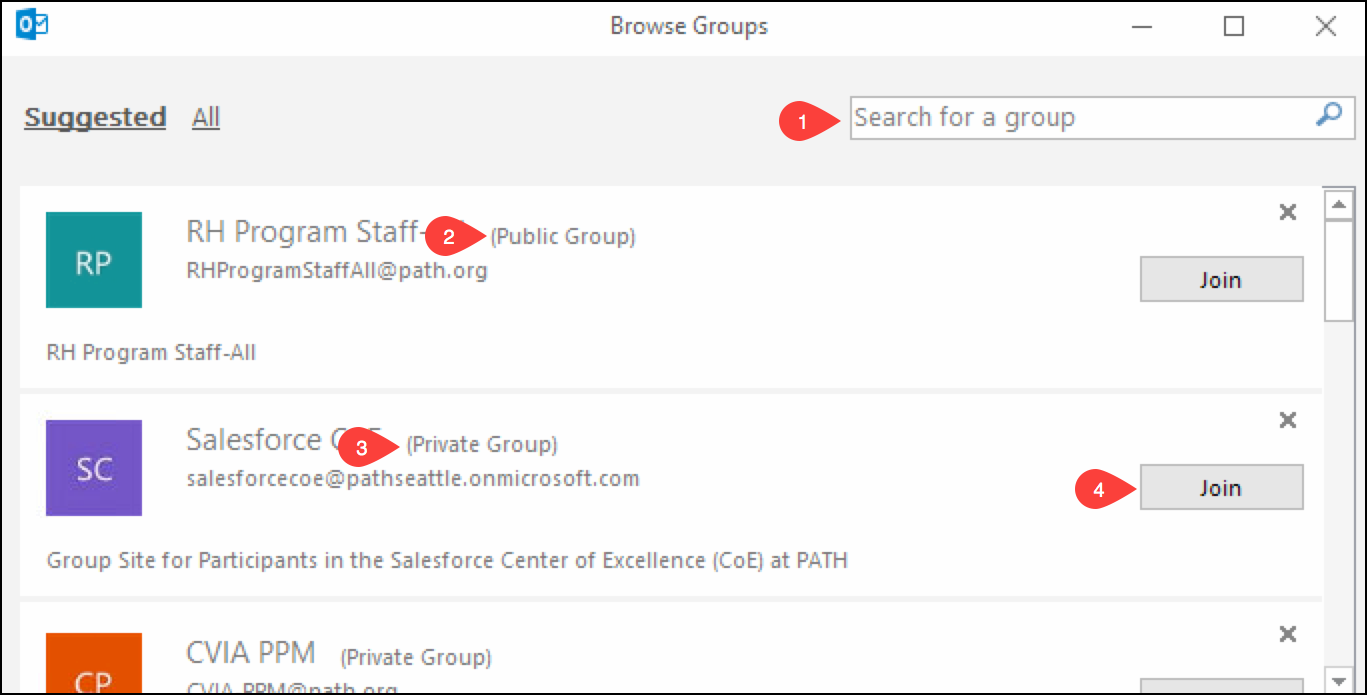
Joining existing groups
At some point you may want to join an existing public or private group. You can browse all existing O365 groups to see both private and public groups.
- Search for a group by name to go directly to that group.
- You can join a public group by clicking Join and you'll immediately have access to the group. Public groups will allow anyone to join without approval.
- Private groups require approval from the group owner to join.
- Clicking join on a private group will notify the group owner(s) and he or she will then approve or deny the request to join the group.
Related Articles
Related articles appear here based on the labels you select. Click to edit the macro and add or change labels.
| Filter by label (Content by label) | ||||||||||||||||||
|---|---|---|---|---|---|---|---|---|---|---|---|---|---|---|---|---|---|---|
|
| Page Properties | ||
|---|---|---|
| ||
|