PATH New Hire FAQs
Welcome new hires! This page is here to help you get to the support information you need within the first few days to weeks at PATH. From here you have access to FAQs and How-tos as well as links to the IT Knowledge Base and the IT Service Desk Portal. Please download the new hire packet that contains helpful information: Welcome to PATH IT
Welcome to the PATH IT FAQs
Newly hired employees with support issues or questions should start on this page. This page can answer the majority of support questions new hires have within the first 30 days at PATH.
Need to search the IT Knowledge Base or submit a support request?
How do I get...?
The best way to get computer support is to use the IT Service Desk portal to submit a support request by clicking the Submit a Helpdesk Support Request button above.
Using the Service Desk portal
While the knowledge base is the best place to start when you have a problem, it can't solve every problem. If you don't find what you're looking for, your next step is to submit a support request using our Service Desk portal. The Service Desk portal is easy to navigate and simple and intuitive to use. It's also the place to see and update your open tickets.
- Log into the Service Desk portal.
- If using the search bar has not yielded any good results, select the support category on the left and the support type on the right side:
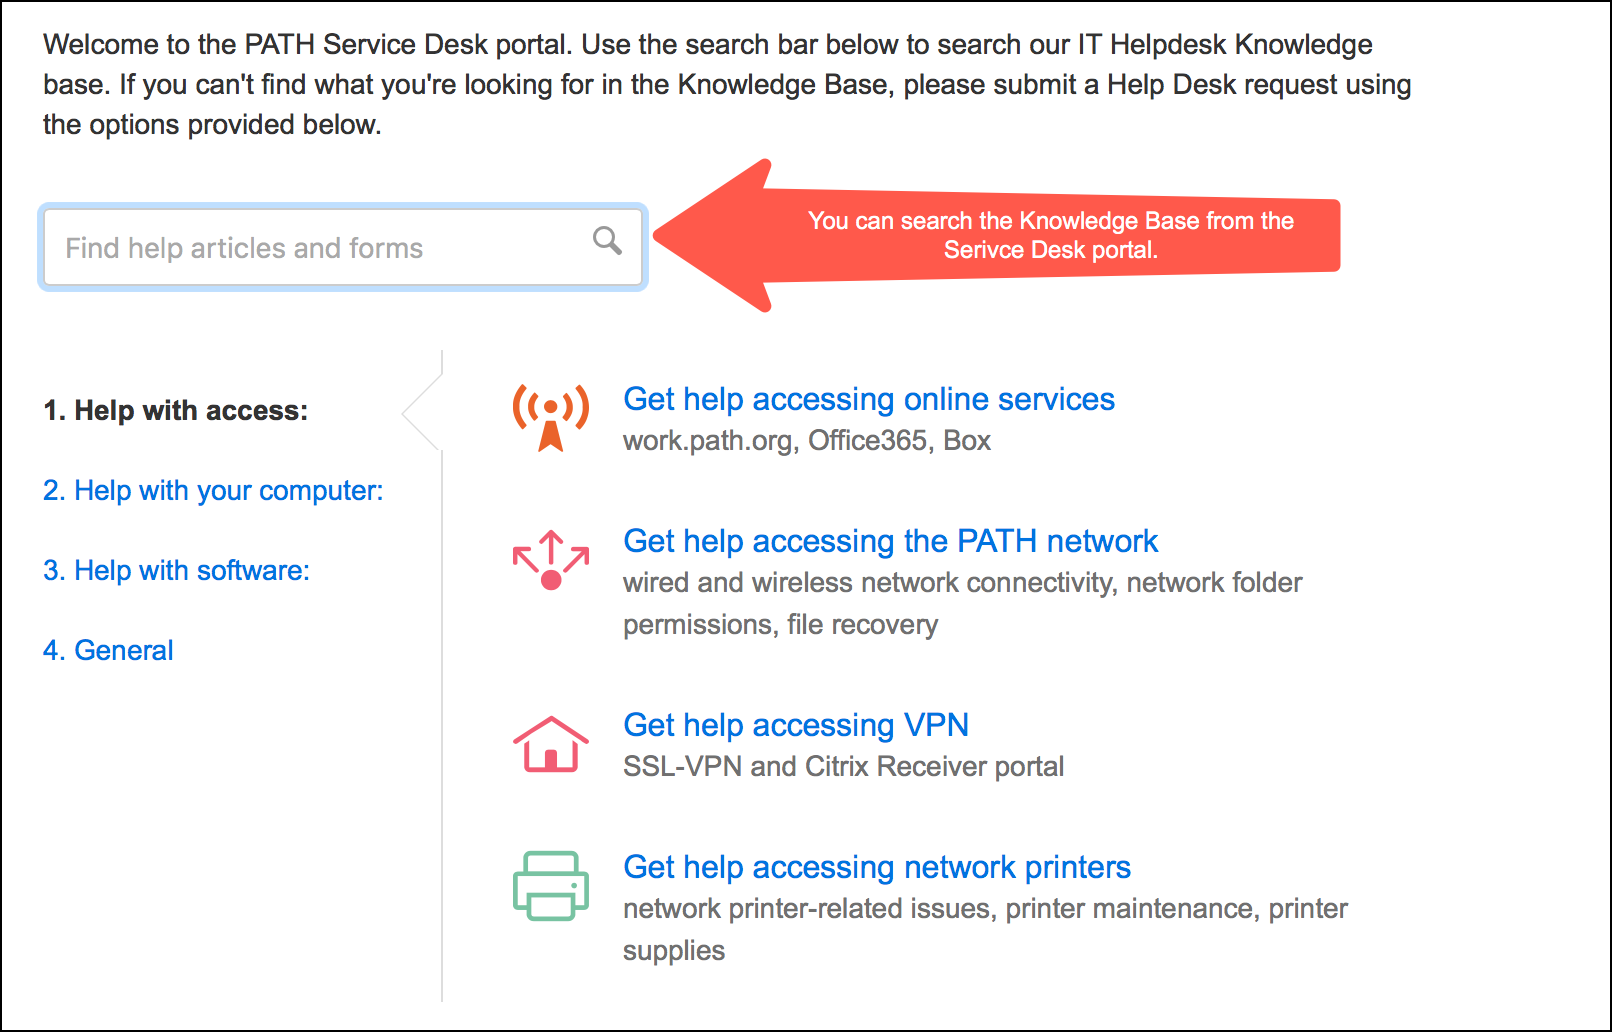
- Each support type has a short form to fill in, asking for all the relevant information regarding your issue. Using these support categories lets the helpdesk triage, work on, and resolve issues faster.
- After you submit a support request, you'll get messages from the service desk confirming your ticket has been received.
- If you need to respond to or update a support request using the Service Desk portal is the best way to do that.
Before you can log into the IT Service Desk portal, you'll need to create your account. Don't worry, it's easy and the video below explains how.
To purchase software:
Step 1: Please see the PATH Software Inventory page to determine if the software is already approved for use at PATH.
If the software is listed in the inventory, review the classification indicating if the software is approved, tolerated, or forbidden. If allowed at PATH, review the associated document in the Software Inventory library to determine how to request the software.
If the software is not listed in the inventory, or if you are seeking software development, please proceed to step 2.
Step 2: Complete the IT Software Procurement | IT Project Request intake form to submit requests to the Information Technology (IT) department for:
- Purchase or subscription of software or IT technology that is not already pre-approved by IT as denoted on the PATH Software Inventory; or
- A project to undertake implementation or integration of software or IT technology; or
- Development of custom software or enhancements to existing systems.
To purchase hardware and accessories such as:
- wireless mice
- long-life batteries
additional displays
- audio headsets
- computer memory
docking station (docking stations come with a power adapter)
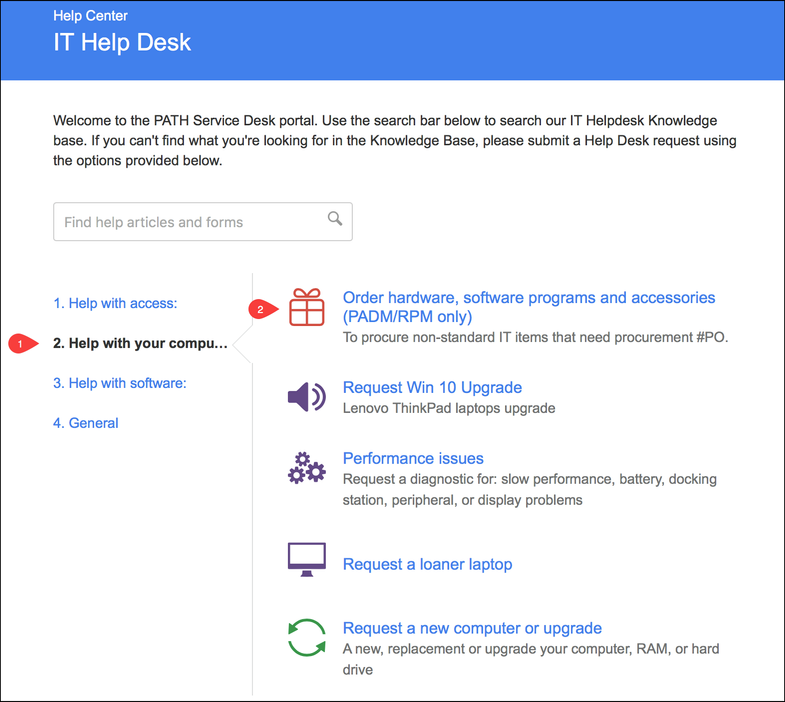
Please submit a helpdesk support request, using the Help with your computer → Order hardware, software programs and accessories option, as shown below.
Please make sure to attach a completed Procurement Request Form to the request. After you receive the software or the license, submit a helpdesk request to have the software installed for you if necessary.
The following software comes standard on all laptops:
Microsoft Windows 10
- CarbonBlack AntiVirus
- Microsoft Office 365
- Word
- Excel
- Outlook
- PowerPoint
- OneNote
- Access
- Teams
- Box (if you don't have Box installed, please submit a helpdesk support request)
- TeamViewer (for remote support)
- Adobe Acrobat Reader
- 7-Zip (for opening and creating .zip, .7z, and .rar files)
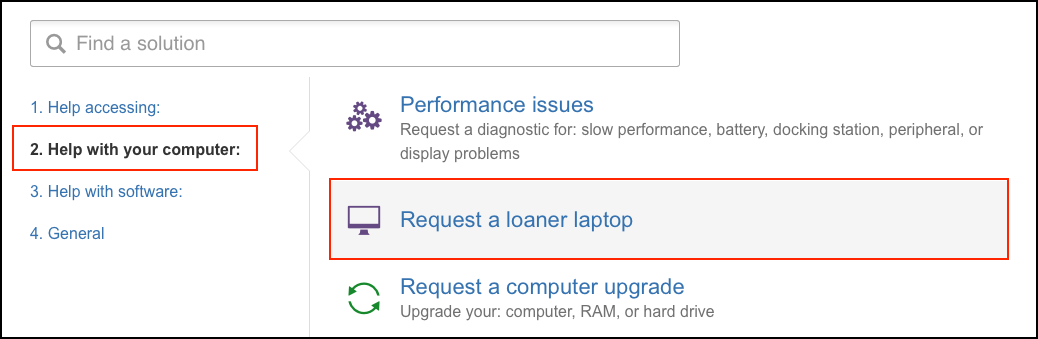
If you need a loaner laptop, requesting one is easy. Go to the Service Desk portal and use the Help with your computer → Request a loaner laptop option.
If you're requesting a loaner in advance, please let us know:
- When you need it
- What special software, if any, it needs
- How long you'll need it
Info:
Loaner laptops can sometimes go out the door quickly, so give us as much lead-time as you can when requesting one.
Contact the distribution group's owner(s) so they can add or remove you
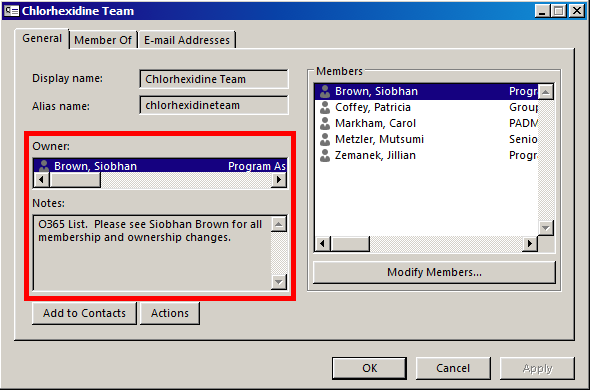
If you need to be added to an email distribution group as either a member or an owner, contact the group's current owner(s). Group owners are responsible for all membership and ownership changes. Groups owners can add you or remove you quickly and easily.
Where to find the group's owner(s)
Sometimes it's not obvious who the group owner is. You can find the owner(s) in two ways:
- In Outlook, open the distribution group properties and look in the Owner and Notes fields. This should list the groups owner(s).
- In Outlook Web App go the People tab, click Directory → All Distribution Lists in the left panel. This displays all the distribution groups in the Global Address List.
- Use the Search field to search for the group and click the Notes or Owners options. This tells you who to contact.
To get support for your computer while you're working at home, you'll need to run TeamViewer. You should already have it on your computer, as a shortcut on your desktop. If so, skip down to the Running TeamViewer section. If you don't have it, you'll need to install it.
Installing TeamViewer
Step-by-step guide
TeamViewer should already be installed on your computer and you should have an icon for it on your desktop, as shown below. If you don’t see it on your desktop, Go to Start → Computer → Local Disk (C:) and search for it there. If you can't find it, you will need to download the program.
- Download the program directly from our Knowledge Base, by clicking here → TeamViewer QS download.
- If prompted to run or save, chose to save it to your Desktop.
- After saving the program, double-click to run it.
Running TeamViewer
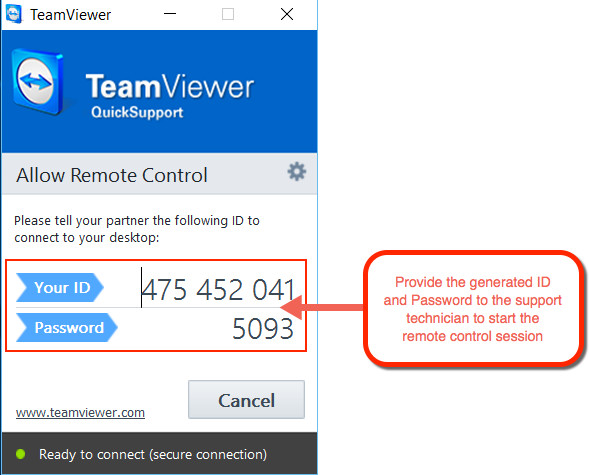
Double-click the TeamViewer icon to launch. TeamViewer is a very simple program and requires no input from you once you have it running. You only need to provide the user ID and password to the support technician. This should be done over the phone whenever possible.
After the technician has connected, you’ll see a status display in the bottom right of your screen. The status screen displays who is connected and allows you to end the connection, as well as disable and enable remote control.
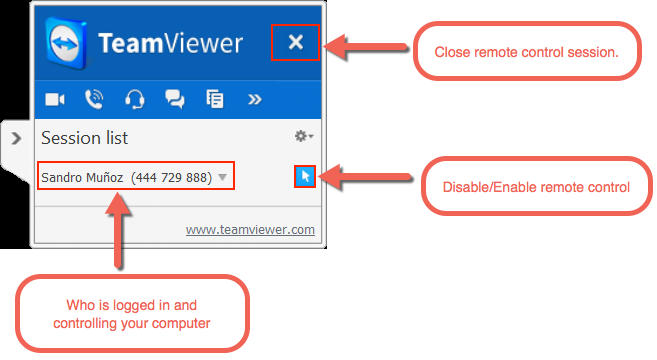
Once the session is finished, the technician will terminate the connection. You can also terminate the session by using the red X icon.
Who do I talk to about...?
For help with desk phone, your voicemail or the furniture in your cube, please contact facilities. They are responsible for supporting those items. Additionally, see the phone usage guide in the section How do I use...My phone?, below.
Getting support for HP Workgroup printers
The helpdesk supports these printers. Please submit a support request via the Service Desk portal.
Getting support for Xerox multi-function copiers
The Xerox multi-function copiers are supported exclusively by Facilities.

Reloading paper can be done by anyone.
How do I access...?
Step-by-step guide
Logging into work.path.org
- Go to https://work.path.org and login with your PATH email address and password, if prompted.
- After you log in, you may be prompted to set up your work.path.org account. If you have never logged into work.path.org before, please go to this how to document: How to log into work.path.org.
- Click the Outlook app. You'll be taken to the Office365 site and logged into your mailbox.
- If you are logging into Office365 from outside the PATH network, you will be asked to authenticate again. You will need to re-enter your full PATH email address and password.
Accessing Calendar and Contacts
You can also access your calendar and contacts from Outlook Web App by clicking the mail, calendar, contacts, and tasks buttons at the bottom of your mail window.

You can access work.path.org on a Mac as well as a Windows computer.
If you need to access PATH email, calendar, or contacts on your iPhone or iPad, the easiest way to do so is using the Microsoft Office app. This app is downloaded and installed for free from the app store. This app is updated regularly so screens may not look exactly as they do below.
Configuring Outlook on an Android phone
Step-by-step guide
- Search for and download the Microsoft Outlook app for your iPhone or iPad.
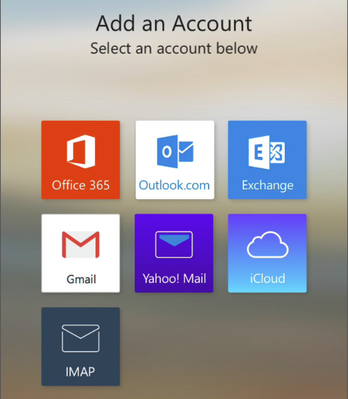
- Open the app, tap Add an Account and select a new account to add. Select an Office 365 account.
- Enter your PATH email address, then enter your email address and password and click Sign In.
- Once the account is added successfully, you'll see the message below and you'll be prompted to take a quick tour or add another account.
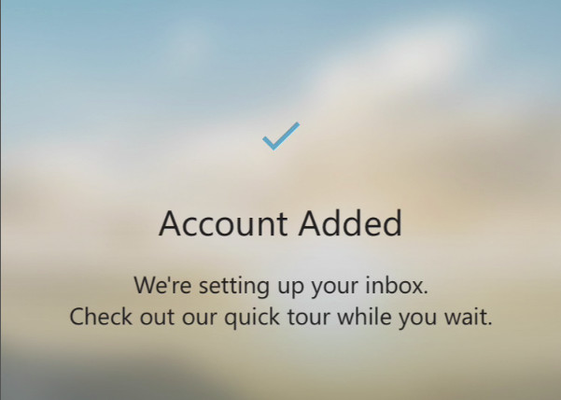
- Swipe left through the Quick Tour and, finally, tap Go to Inbox.
- If you use an online file storage service such as OneDrive*, Google Drive, Dropbox, or Box, you can add those services as an account. This lets you attach files stored in those services as attachments in your messages.
The mobile version of Outlook also lets you access Box, so you can attach files stored in Box directly to your messages.
Additional Resources
To use Box you'll need a Box account first. Once you have a Box account, you can log into Box.com and install Box Sync. Our Getting Started with Box guide has more details.
Requesting a Box account (only applies to temps, contractors, or interns)
Step-by-step guide
- Log into the IT Service Desk portal and go to Help accessing: → Get help accessing online services.

- Submit a request asking for a Box account.
- Once your account is created and active, you will receive a Welcome-to-Box email letting you know your account is ready to access.
PATH Box accounts are only available to PATH staff.
Getting Started with Box
If you're not familiar with Box and need some help getting started, please take a look at our Getting Started with Box guide.
To add a network printer, you must be connected to an internal office network, such as the PATH wireless network, or connected to the network with an Ethernet cable. You cannot add a printer from the PATH-GUEST network.
Step-by-step guide
To add a network printer you will need to know the printer’s name. This is usually located on a label on the front of the printer. Here’s how to add them.
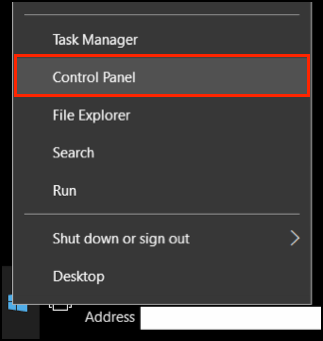
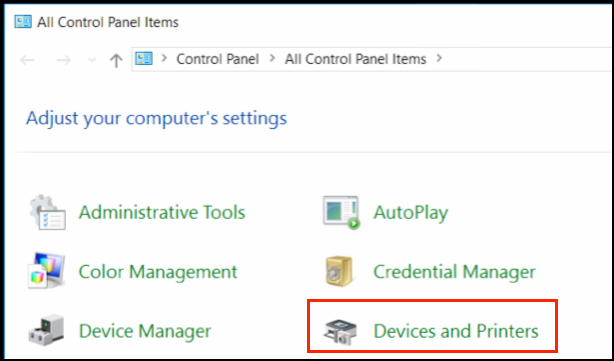
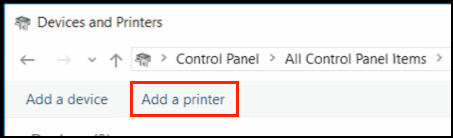
Adding a network printer in Windows 10
- Right-click the Start button then click Control Panel.
- Click In Control Panel, click Devices and Printers.
- At the top of the window, click Add a Printer.
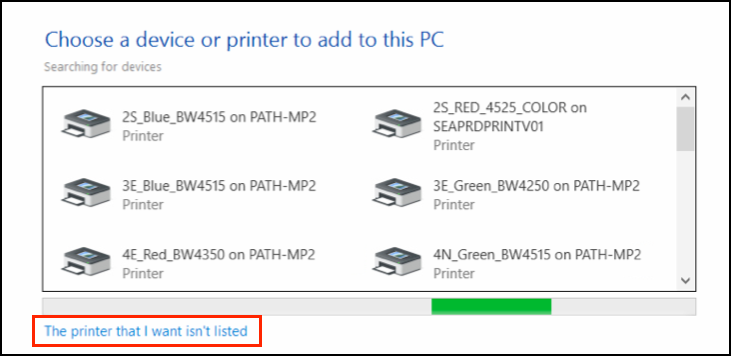
- In the window of possible choices, click The printer that I want isn't listed.
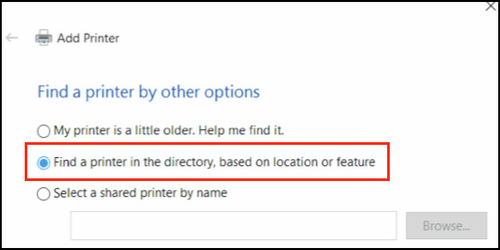
- Select the option to Find a printer in the directory, based on location or feature and click Next.
- Now you will see a list of all network printers in all PATH offices. You can search for a printer by name, location, or model. You can also sort the results by the column headers.
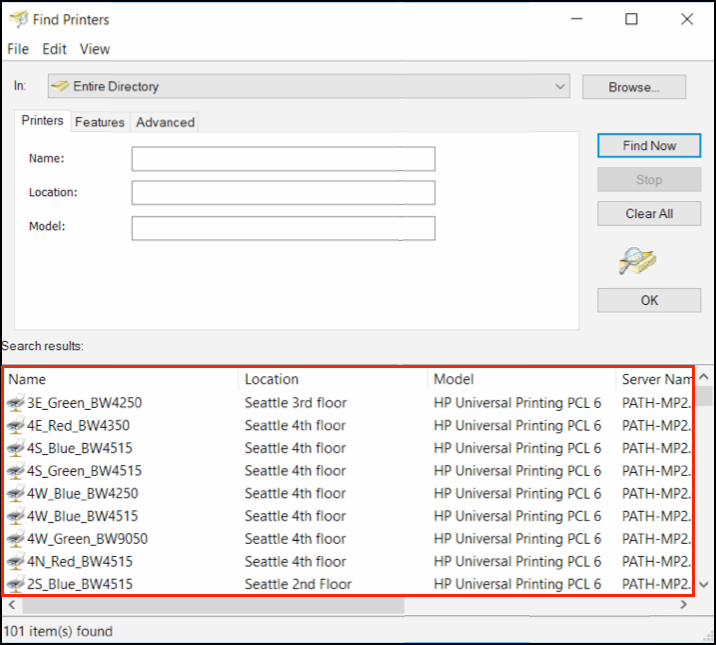
- Double-click the printer you'd like to add. Then click Next after the printer has been added successfully.
- Finally, choose whether or not to set the printer as a default printer and whether to print a test page or not. Click Finish.
Setting the default printer
After adding the printers you may want to change your default printer—the printer your computer will print to unless you select a different printer. It is normally convenient to set the printer closest to you as the default, but it can be any printer.
When adding a printer in DC
- While any PATH staff member can connect to a DC printer/copier, the Ricoh copiers require a datawatch key card to release a document from the machine. PATH staff who are visiting the DC office will need to email dcfacilities@path.org for more details.
- A Virtual Copier printer should be used by DC Office staff only. Equitrac, a program installed on DC staff laptops asks for a project code every time you click Print.
- The Virtual Copier printer places your print job in a print queue for the next 8 hours. Swipe your office Datawatch card at any of four Ricoh photocopiers in the office to release your documents for printing.
- Staff visiting The PATH DC have to choose a printer other than Virtual Copier printers. They can print 40 pages (20 sheets) without providing their project code.
- By default, printers print double-sided.
FAQs
The following browsers will give you a good experience accessing sites:
We recommend Google Chrome in Windows as your default browser.
.png?version=1&modificationDate=1422814200958&cacheVersion=1&api=v2&width=150&height=150)
- Internet Explorer can also be used in Windows, but some services may not work properly.
In OS X we recommend Safari or Google Chrome.

Normally it's a good idea to have both Internet Explorer and Chrome installed. Sometimes a site will display better in one or the other.
Backing up your files is extremely important. You are responsible for backing up your own files.
Using Box as a backup
Disaster Recovery Duo or Trio

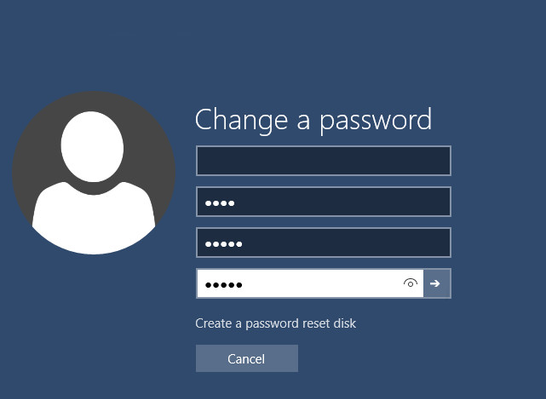
Changing your Windows login password using Ctrl+Alt+Del
- At any time you can press Ctrl+Alt+Delete then click “Change a password…” to change your password.

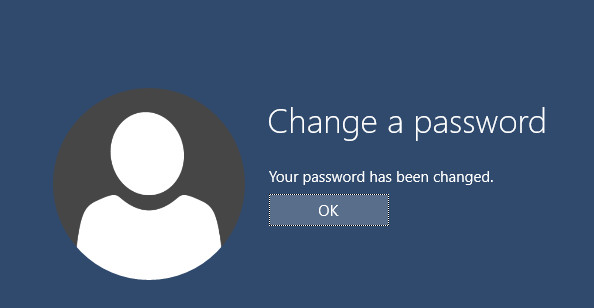
- At the password change screen, enter your current, password in the Old password field. In the New password field, enter your new password. Then enter it again in the Confirm password field and press Enter.
- After changing your password successfully, click OK.
![]() Passwords must have the following attributes:
Passwords must have the following attributes:
- Must be at least 12 characters in length
- Must contain a combination of at least 3 of the 4 following characteristics
- Upper-case letters (A through Z)
- Lower-case letters (a through z)
- Numbers (0 through 9)
- Non-alphabetic characters (#, $, %, &, !, etc.)
Cannot be a password that has been used in the past 24 months.
Examples of passwords that meet the requirements:
- Christmas$now (upper-case, symbol, and lower-case)
- ch@ng3!m3now (lower-case, symbol, and number)
A few important notes about changing your password
- Don't let your password expire, especially if you will be out of the office. It's much easier to change it while you're in a PATH office.
- Changing your password will temporarily prevent you from accessing SharePoint sites. This is a known issue.
- Don't change your password on a Friday or before going away. It's likely you won't remember the password on Monday morning or when you return.
- Make sure to change your password on other devices that access your mail, like your phone or tablet.
- You can change an expired password by logging into work.path.org and logging in with your expired password. You'll be prompted to change it.
- Entering a password incorrectly 3 times in a row will lock your account, but it will unlock itself after 20 minutes.
Tips for changing your pasword
- Don't ignore the notification or wait until you're out of the office to change your password. It's much easier to change it while you're in the office.
- Try not to change your password on a Friday. You may forget it by the time you come in on Monday morning.
- Change your password at the end of the day if you can, since changing it will temporarily lock you out of SharePoint and Office365.
- You can also change your password by going to work.path.org and logging in. If your password is expired, you'll be prompted to change it right away.
- Entering your password incorrectly 3 times in a row will lock out your account. Locked accounts will unlock themselves in 20 minutes.
If you don't normally work in a PATH office:
If you're not normally connected to the PATH network in a PATH office you will not be automatically notified of an upcoming password expiration. You can look up when your password is going to expire using a command, as shown below.
Checking your password's expiration date
- If you're running Windows 7, go to Start and type cmd in the Search programs and files field. Then press Enter.
- If you're running Windows 8, right-click the Start button, click Run, and type cmd.
At the Command Prompt type:
net user /domain %username%
and press Enter. See the first line in the image below for an example.
This will display your account information, including when you last changed your password, and when it expires, as shown below in red.
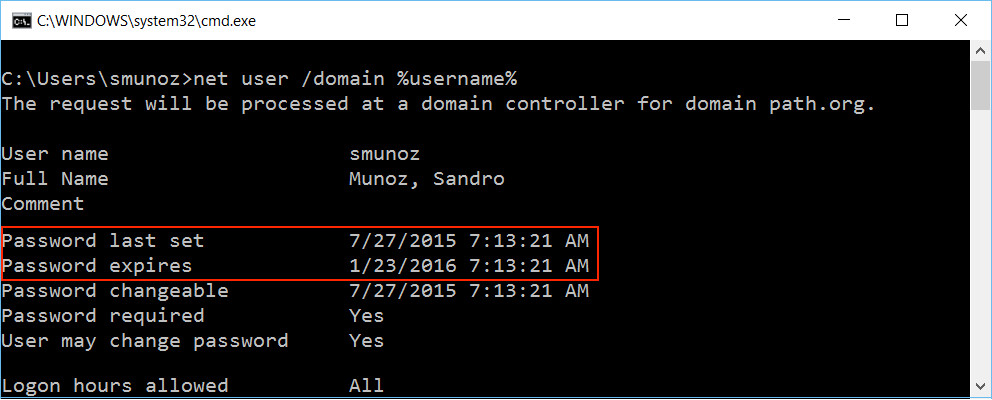
(Click the image to enlarge it)
You must be in a PATH office or connect to SSL-VPN to run this command successfully.
Changing your password
If your password is expiring soon, you can change it by pressing Ctrl+Alt+Delete and clicking Change Password. Enter your current password and then a new password and then confirm the new password. For more information on changing your password, please see our FAQ Changing your Windows login password.
Spam and phishing emails are two types of junk mail. Spam is annoying and generally harmless. It's usually an advertisement, a newletter, or some other notification that you don't wish to receive. Spam can be deleted or you can adjust your junk mail settings to filter it out.
Phishing emails, on the other hand, can be dangerous to open. These messages usually try to convince you or enticing you into clicking on a link or opening an attachment in a message. The link or attachment can then compromise the security of your computer and its files. This can lead to your data becoming inaccessible or confidential information or money being stolen. Phishing emails should be reported using the PhishAlarm plug-in for Outlook.
It is important that you learn how to recognize Spam and Phishing emails. The section below explains what to do if you think you get spam or phishing messages and how to handle them.
If you don't recognize the sender
If you don't recognize the sender or subject of the message you should be suspicious. If the message contains attachments or links, do not click on any of them. They may load harmful malware on your computer or compromise your username and password.
If you recognize the sender
If you do recognize the sender, but are still suspicious, contact the sender and ask if the message is legitimate. Don't click on any links if you're suspicious.
What does a phishing message look like?
Here is an example of what a phishing scam in an email message might look like.

Spelling and bad grammar – Cybercriminals are not known for their grammar and spelling. Professional companies or organizations usually have a staff of copy editors that will not allow a mass email like this to go out to its users. If you notice mistakes in an email, it might be a scam. For more information, see Email and web scams: How to help protect yourself.
Beware of links and attachments in email – If you see a link or attachment in a suspicious email message, don't click on it. Rest your mouse (but don't click) on the link to see if the address matches the link that was typed in the message. In the example below the link reveals the real web address, as shown in the box with the yellow background. The string of cryptic numbers looks nothing like the company's web address.

Links might also lead you to .exe files. These kinds of file are known to spread malicious software.
Threats – Have you ever received a threat that your account would be closed if you didn't respond to an email message? The email message shown above is an example of the same trick. Cybercriminals often use threats that your security has been compromised. For more information, see Watch out for fake alerts.
Spoofing popular websites or companies – Scam artists use graphics in email that appear to be connected to legitimate websites but actually take you to phony scam sites or legitimate-looking pop-up windows. For more information, see Avoid scams that use the Microsoft name fraudulently.
Cybercriminals also use web addresses that resemble the names of well-known companies but are slightly altered. For more information, see Protect yourself from cybersquatting and fake web addresses.
What is 7-zip?
7-zip is a program that lets zip a file or a group of files into a single file, called an archive or zip file. This archive file is often zipped to reduce its size, which is very useful when sending a large file or files via email or trying to fit files on a flash drive. This saves time and bandwidth when sending or receiving the file.
7-zip can open various types of archive files, such as .zip, .rar, .tar, and .7z. 7-zip is free of charge, completely ad-free, and can encrypt archive files with a password. Winzip is a similar program, but is not free of charge.
Step-by-step guide
Creating a Zip File
To create a zip file using 7-zip you must have the program installed. If it is not already installed you can download it, free of charge, from www.7-zip.org.
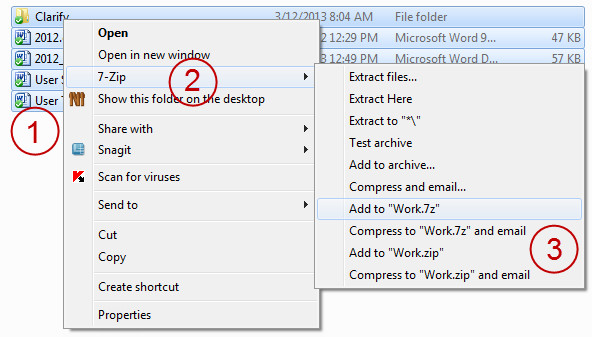
- In an Explorer window select the files and folders you want to archive. Files and a folder have been selected as shown below.
- Right-click the selected files and click 7-zip. If you don’t see a 7-zip option, then 7-zip is not installed.
- You have several options for compressing the file(s). Selecting Compress and email…will create a zip file and immediately add it to an email as an attachment. Selecting Add to “Work.zip” will add the files to a zip file called Work.zip. The zip file will have the same name as the folder you are working in, but you can rename it after it’s created.
Please note that .jpg images, .mp3 and .wma audio files, and .avi, .mp4 and .wmv video files are already compressed formats and cannot be further compressed. They can still be added to the archive, but they will remain the same size.
Extracting Files From a Zip File
- Right-click the zip file, in this example, Work.zip, as shown below.
- Select one of the extract options.
- These options let you specify the destination for the extracted files. To extract them to the working folder, select Extract Here. Selecting Extract Files… lets you specify a different destination folder. Selecting Extract to“Work\” will create a folder called “Work”, in the current folder and extract the files to this new folder. Selecting Open archive will let you see the contents of the archive file without extracting the files.
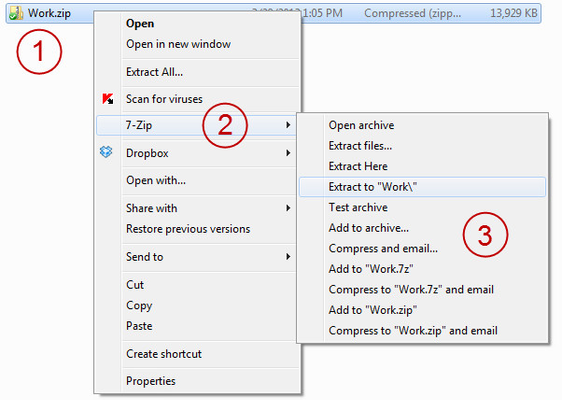
If you’re not sure which option to select, Extract Here is the simplest option. You can move the files to your desired destination after the files are extracted.
.zip or .7z format?
Both the .zip and .7z format accomplish the same goal of zipping and unzipping files, but the .7z format often compresses files more efficiently than the .zip format. The format you choose depends on how compatible you want the resulting archive file to be. Some programs may not be able to open .7z files. If your recipient cannot open a .7z file, you can recreate the archive as a .zip file or the recipient can download and install 7-zip.
How do I use...?
Facilities can provide you with support and training for the copiers and scanners in your office. Please contact them for additional information.
Mobile phones and tablets can only join the PATH-GUEST network. The PATH-GUEST network is normally an unsecure network which only provides Internet access. You can not access internal, secure resources while connected to the PATH-GUEST network.
Accessing the PATH-GUEST Wireless Network Using Windows 10
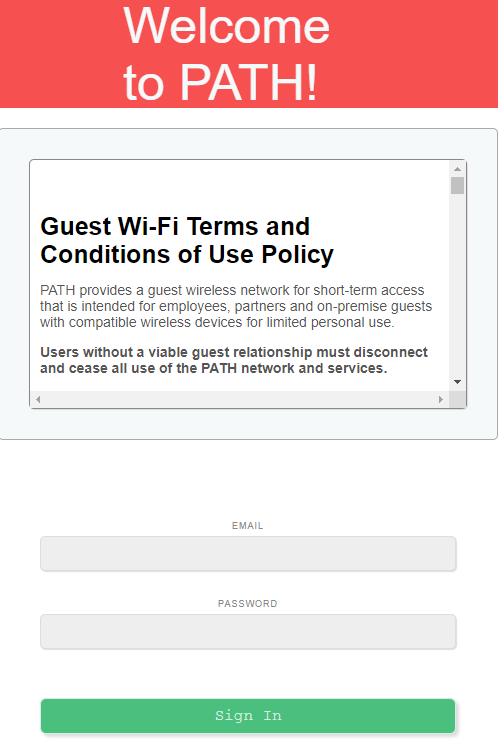
Connecting to the PATH-GUEST network simply requires selecting it from the list of available wireless networks. There is no password required to join the network in the US but in International offices you will be required to enter credentials you can find by clicking here.
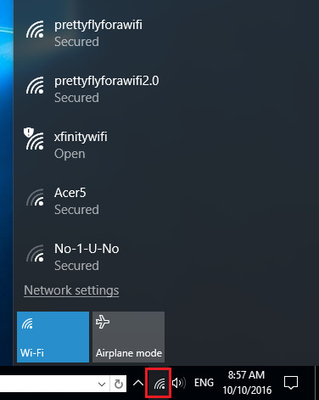
- Click the wireless network icon near the time and date. In the list of available networks, select PATH-GUEST.
Accessing the Wireless Guest Network Using a mobile device
Go to your phone or tablet's settings and select Wi-Fi. From the list of Wi-Fi networks, select PATH-GUEST.
Guest WiFi Terms and Conditions
In both cases, you will be presented with a Conditions of Use splash page. In the US you are able to Accept and Connect while in International offices you will have to enter credentials you can find by clicking here.
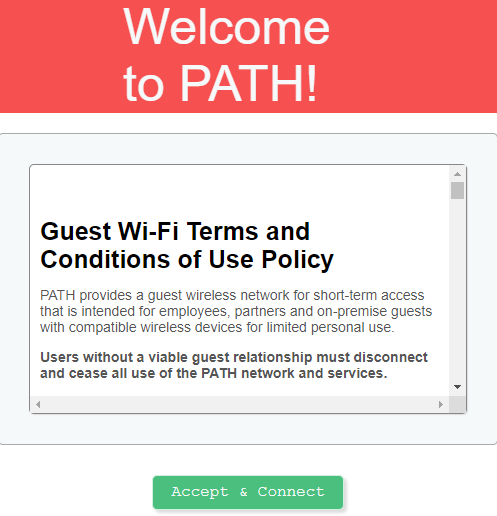
While connected to the PATH-GUEST network, you will not have access to shared drives, printers, or PATHnet. You will only have access to the internet.
See the user guide below for information on using your desk phone.
For help setting up or using your voicemail, please
Getting Started with...
Which browser should you use to access Box?
We strongly recommend that you access and use Google Chrome as your default browser, especially if you will be accessing Box regularly. Internet Explore has known compatibility issues with Box.
Sharing Files and Folders (replacing email attachments)
Once you have files and folders saved in Box you may want to share some of those files or folders with others. Sharing and collaborating are two different ways of doing that.
Whenever possible, you should share documents and folders using links instead of attachments. Why?
- Using a link doesn't take up any space in your sent items or the recipients' inboxes.
- Most email servers enforce strict attachment size limits (PATH's is 20MB). Your shared files will never bounce back because they're too large and you'll never have to shrink them down before sending them.
- You can share files directly from within Outlook using the Box for Office plug-in. See the video in the Getting Started folder below.
Sharing files and folders lets you send a link instead of an attachment. This is an easy way to give others read-only access to a file or folder. You can share a file or folder with anyone, even if they do not have a Box account. Sharing is a one-way relationship in the same way as sending an attachment. Recipients can download a document or the contents of a folder, but they cannot make changes to the content of that document or folder.
Sharing a file or folder
- Hover over the file or folder you'd like to share. In the example below we're sharing a folder but the process is the same for a file.
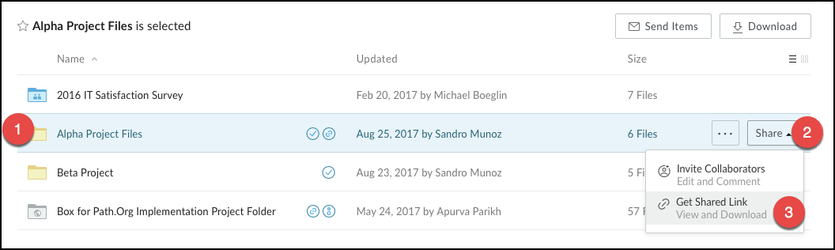
- Click the Share button.
- Select Get Shared Link

- Click Copy if you'd like to attach the Shared Link into an email.
- Enter the name (if sharing within PATH) or email address of those you'd like to share the folder with.
- Enter a message explaining what you're sharing and why. This helps the recipient understand what you're sharing.
- Click Send and the link will be sent out to the recipient(s).
By default, anyone with the link can open the shared file or folder. This behaves just like sending an attachment. Unlike an attachment, you have additional advanced options to give you more flexibility and control over your shared content.
Disabling a shared link
You can disable a shared link at any time, removing access to the shared file or folder.

8. Go back to the sharing pane (step 2 above) and click People with the link.
9. Click Remove Link and then close the pane. This will unshare the file or folder.
When you share a folder, you share the entire folder and its contents. This is still shared as read-only so the recipient cannot add or remove files from the folder. They'll just be able to view and download the content. This is not something you can do with an attachment.
You can share files or folders using this method with anyone, whether they have a Box account or not.
Collaborating on Files and Folders
Sharing files or folders gives any recipient read-only access to files and/or folders, but sometimes you want a recipient to make changes or a file or the contents of a folder. You may need someone to edit a document or add/remove files from a folder. To do this, you need to invite the recipient as a collaborator. To invite someone as a collaborator, he or she must have a Box account.
If you would like to invite someone outside of PATH to collaborate on a folder, but they do not have a Box account, they can easily create a free account at Box.com. Free accounts provide:
- 10GB of storage (5x what Dropbox free accounts provide)
- Uploading of files up to 250MB in size.
- Access from mobile devices
- Desktop syncing
If you need to collaborate with a PATH employee and he or she does not have a Box account, please contact the helpdesk to have them create one for the employee.
To invite someone to collaborate on a folder
- Navigate to the folder you'd like to invite others to and click the Share button to the far right of the folder.
Click Invite Collaborators.

- Enter the names or email address of anyone you'd like to invite as a collaborator. Collaborators will be able to edit files and folders based on the permissions you give them.
- Select the permission level for the people you're inviting. Not sure what permissions do what? Click the "i" next the Learn More to learn more.
- Enter an optional message.
- Click Send Invites to send out your invitations to collaborate.

- Folders that you are collaborating on are denoted with a blue folder icon. This makes it easy to visually determine what folders you're collaborating on.

- Your invited collaborators will receive an email notification as well as a notification within Box itself letting them know they have been invited to collaborate on a folder. The folder will appear in their folder list and it can be easily synced to their local computer.
When collaborating with multiple people
If you're going to be collaborating with more than 2 people, it may be better to create a Box group and then invite the group as a collaborator. To create a Box group, create the group in O365 and then submit a helpdesk support request to make the group active in Box. Once it's active, you can invite it as a collaborator.